Sunday, October 28, 2012

Ghost Face Tombstone... A Three Year Project Nearly Complete!


Hey guys,

So, about three years ago I saw a prop from a home haunter that was a face coming out of a TV.  It was super creepy and I loved it.  I wanted to put it in our haunt, but a TV in a graveyard seemed odd, even for a Halloween display.

It took me a couple of days but suddenly the very obvious way to use it came to mind... a tombstone with a face coming out of it!  Why it took a couple of days to come up with that is anybody's guess, I certainly don't know why.

But, I digress.  I immediately sat down and drew up the plans and then, nothing.  I never had time to build it. 

But, that was the first year.  Like I said, this idea is three years old.

Last year I revisited the idea and actually cut out a tombstone with a hole in the middle and went out and bought a small motor.  "Small" is the operative phrase here.  It was too small to push the face through the mesh.  I then took apart several house fans and for one reason or another just couldn't make it work.

That brings us to this year.  This year I was walking through a Halloween store when I saw this...

People with money and means can make this work using cheap plastic!
So, for a price slightly cheaper than I paid for a motor I will probably never use, I bought this Halloween prop and cannibalized it!


Here's what I did...
 
I took the face, conveniently housed in a face shaped motor housing and strapped it to the tombstone I made last year with pipe strapping and a couple of screws. Notice the little shelf where the old motor was once mounted, now no longer necessary. 
Here's the front.

And here is the ghost face pushing out of the tombstone

And that is all there is to it.  If you notice, one layer of spandex is slightly transparent.  I know, you probably won't be able to see through it in the dark of night but the Hollow is surprisingly bright when fully lit up and I feel the need to put a second layer on top.


That's why I said the project is nearly complete.

I'll show you what it looks like when I finish.

Later.


Monday, October 22, 2012

There Be Tomstones in the Hollow... and a Mausoleum!

Hey everyone!

The Hollow took another step toward becoming a graveyard this weekend.

We added the tombstones as well as the Mausoleum.  Have a look.

Click the pic for a larger image...


This ends the roughing out part of the Hallow construction.  What I mean by that is that when you pass by the house you can now see we are building a graveyard.

Everything from this point forward is like putting the icing on the cake and, truthfully, this is where the fun begins.

Updates to follow...


Building Fencing!

Hey guys,

This weekend was quite productive, for after three years of planning I have finally finished the last of the "iron fencing" that surrounds the Hollow.

The first year that we did our fake iron fencing we used it to lay out the path that everyone follows as the pass through the Hollow.  I knew that when we did it I would one day hope to have our fake iron fencing surround the entire graveyard. 

The second year we expanded our iron fencing to line the front part of the graveyard, the part that backs up against our sidewalk.

And finally, this year, I built the fencing that would run along both sides of the graveyard and end at the house.

Last year I showed how our "iron fencing" was built but for those who are new to the blog and don't want to scroll down to last year I will show you again.

As always, click the pic for a lager image...


The rails are constructed from 1x2's that are 8' long.  Our fencing has 13 pickets so it's just a little math to figure out the spacing.  Once you got that figured, simply drill the holes for the pickets.

Our pickets are made from 1/2" PVC and their lengths are alternating 36" and 40".

Spacing of the rails is whatever you think looks good.  For our fencing, the bottom rails are 6" from the ground and the top rails are 6" from the top of the 36" pickets (or 30" from the ground).  I use one drywall screw to attach the picket to each rail (or 2 screws per picket).

Once constructed, paint the fence with flat, black spray paint.  Our fencing takes 3 cans per fence.  Don't get expensive paint, that is a waste of money.  I've found that every home good store has a 99 cent can of black spray paint.  That is perfect for this project.

And that really is all there is to it.  Be warned, despite it's very simple construction, the fencing is time consuming in their construction.  This is simply due to the scale of the project.  This year I built six fences and it takes about an hour per fence.  That breaks down to about 30 minutes to construct and 30 minutes to paint. 

I thought I would get faster the more I built these things but looking back I discovered that to be the average all three years I've built them.  I'm sure there are some people who could do it faster than me though so go for it and give it a try.

Later.

Tuesday, October 16, 2012

Columns Complete!

Hey everyone,

Well, I said the next time you see the columns they will be out front in the Hollow and here they are...

If you look way down on the other end you will see the old columns!


As always, you can click the pic for a better view.

And I know I said yesterday they were officially done but now it is officially official.

So, now what's next?  Well, the wife is working on the Pumpkin Statues to sit atop our new columns. 

For me?  If you look in the pictures above  you will see the fencing doesn't run up the sides of the graveyard.  I will start building new fencing to finally complete the look and for the first time ever, Hollinger Hollow will be completely wrapped in "iron" fencing.

Of course, more pictures and updates to follow...

Sunday, October 14, 2012

Columns Complete... Well, Sort Of...

Hey everyone,

The new Exit Columns are finished...

OK, well, not quite, but let me show you what they look like.

After the wife aged them up...

And after I (the wife doesn't have time to do everything) put on one coat of polyurethane.

Well, they look pretty much done.  That's true.  I still need to add one more coat of polyurethane.  It won't change the look but it will help ensure the new columns are weatherproof.

So, since I'll do that first thing tomorrow, for the purpose of the blog, I am willing to call them done. 

The next time you see them they will be out front in the Hollow.

It's Pumpkin Statue Time!

Hey guys,

The wife was hard at work again today.  Not only did she work her magic on the columns, she also started applying the clay mache to the Pumpkin Statues that will sit atop the columns.

And here is what they look like now...

This one is too funny!

And although you're suppose to love your pumpkin statues equally, I have to admit, this one is my favorite!

So this pretty much gives you an idea of what they will look like, minus the Monster Mud that is. 

Of course, I'll keep providing pics until they are finished.


The Hollow Emerges From the Fog!

Hey everyone!

Well, it's not much, but it's a start.

We started moving parts of the Hollow to the front yard today.

The first step of setting everything up is what I call the "foundation" of Hollinger Hollow.  Simply put, it is the footprint, the fencing and the bridge...

The entrance.  Notice how you can't see the column-less exit...

And the bridge.  Darn, you can see the column-less exit.

And there you have it.  Again, it's not much, but it's a start.

More to follow...

Columns Coming Along!

Hey guys,

So, progress on the new exit columns continued this last week and for those who might have missed how we did this last year I thought I'd show you how it was done.

Construction of the columns was shown in a previous post.  Now has come the time to start decorating them.

As always, click the pic for a larger image...

First thing is to draw the pattern you want to carve.

Then grab your trusty burner and burn the patter into the foam.

Alright, this pic shows a couple different steps.  First is to add the "stone" base and caps to the columns.  This is done with 2x4's and a 1/4" sheet of plywood across the top.  All glued and screwed.  The second part is to make and apply your exterior coating.  This is what gives all the foam and wood  a stone look and feel.  We got the recipe for the "Monster Mud" online and it is a very simple 5 parts drywall compound mixed with 1 part paint.  The paint can be whatever color you want but we went with a light gray to simulate concrete.  Apply Monster Mud with a brush.
 
Look! One of last years entrance columns with this years, newly mudded exit columns.

And here is one of the new columns getting it's bricks painted.  Dark gray for the mortar and a fresh coat of red topped with a fresh coat of black for the bricks.


And that is as far as we are at the moment.  Last years columns had a darker gray paint used in the Monster Mud but this year's paint was a little to light for us so we will follow this up with a light staining of the "concrete" and then we will put an aging glaze on top.  Once done, a couple coats of polyurethane to seal it up and protect it from the weather and we'll be done.

Of course, we'll have pics of that to show you as well.

Until then....

How to Age a Perfectly New Bridge!

Hey everyone,

So, the new bridge is finally complete and as promised in a previous post, I'll show you how my wonderful wife was able to make the bridge look old and unkept.

 As always, click the pic for a larger view...

First thing to do is brush on a wood stain. As we wanted an old looking bridge we used a stain called Weathered Wood.
Let it sit for a few minutes and then wipe it down with a rag.  You want to wipe it as dry as possible.

Next, get an aging glaze (we used one from Rustoleum) and brush that on top of the stain.
Let the glaze sit for a few minutes and then wipe that down.  Again, as dry as possible.

And you're done!  If you don't like the look then repeat the aging glaze until you achieve desired results.


And that is all there is to it.  Of course, if your doing this treatment on something large then it may take several hours to complete.  This was definitely the case with the new bridge. 

Thankfully it is done now.  What's the finished product look like? 

Stay tuned...


Sunday, October 7, 2012

Sneak Peek at Bridge Progress!

Hello everyone!

So, as the title of this post indicates, this is just a sneak peek at the progress of the new bridge.

The problem with a new bridge is that, well, it looks new.  This sucks if you're trying to convey an old world, run down feel with your haunted, abandoned cemetery.

The way around this is to take a bridge that looks like this...

Make sure nothing happens to that bridge, Gibson!

and make it look like this...

Awe, man! What happened? Notice: Gibson has been sacked...

As you can see, what once was pretty and new now looks pretty darn old.

So, how does one achieve such a dramatic transformation seemingly overnight?  I don't know.  I was sleeping while my wife did this.

But, don't worry!  As I mentioned above, this is a sneak preview.  As soon as I get the pictures she took while going through this process I will let you known.

Later.

Wednesday, October 3, 2012

New Skeleton!

Hello again!

As well as making new pumpkin statues (see entry below) the wife has been working on a new skeleton for us to display in the Hollow.

If I remember correctly, this is for a new prop she has in mind.  It's not one I've been asked to help build so I really don't remember what exactly this is for, but that's OK.  It's coming along nicely and I thought I'd share.

(Click the pic for a larger image)

So, cut up some old milk jugs in the shapes of the bones of the forearm and tape them together using shipping tape.

Add several layers of paper mache.  What's that round thing you ask? More on that later.

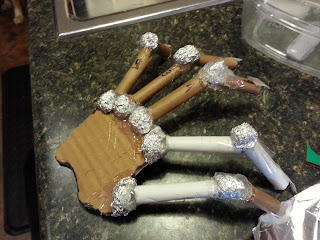
Cut out the shape of your palm from some cardboard. Then cut up the cardboard tube from some clothing hangers to make the different segments of the fingers.  Tape them together and add rolled up tin foil for the finger joints.  Hot glue it all together in the shape of a hand.

Add several layers of paper mache.

Pay close attention to your newly constructed skeleton hand as some are known to have an appetite for house cats.  (NOTE: If you don't particularly like your house cat then feel free to ignore this step)

More cardboard and tape.  Guess what this is...

And here it is with several layers of paper mache and a piece of 1/2" PVC pipe.


Oh look! It's the skeletons head. The wife made this from a giant masking tape ball, cardboard and some milk jug teeth.(NOTE: this is the "round thing" seen several pictures earlier)

And here's the round thing with several layers of paper mache.
Attach it all together (more tape and hot glue) and you have yourself the beginnings of a very cool skeleton. You can't see the forearms in this picture, but they're attached where they should be. Right below the PVC humerus.

And that is all we have so far.

More updates to follow!

Pumpkin Statues!

Hey guys,

Well, we've been working for the last couple of days on the new pumpkin statues that will sit atop our new exit gate columns. 

Of course, when I say "we" I really mean my wonderfully, talented wife has been working on the pumpkins.  I've been uselessly sitting on my butt waiting for it to stop raining long enough for me to paint my new bridge, but I digress.

The process is long so in the interest in updating the blog I've decided to post the progress thus far.  As with all the pictures on this site, click the pic to get a larger image.

So, start off with some rolled up paper (enough to make it stiff like the inside tube of a paper towel roll) and glue it to two little wheels made out of cardboard or any similar material.

Then cut several strips of poster board and glue it to the tube by attaching the ends of the strips to the little wheels.  Hot glue works the best.  Make the strips uneven in their distance from the tube.  This will give the pumpkin its ridged contour.

Instead of going straight for the paper mache the wife had the idea to wrap the first layer in shipping tape.  This was fun because it gave the pumpkins a beach ball feel.

Then no less than 3 layers of paper mache.

This part is just like a real pumpkin, draw and cut.

And since we have two gate columns we will need two pumkin statues.

And that is as much as we have done on the Pumpkin Statues for the moment.

More updates to follow.