Hey everyone,
Well, I've looked over all the pictures taken of this years preparation and display and I don't think there's anything left to say. I'm afraid I've exhausted every topic worth talking about. :(
Still, there are things we didn't get to do and I may as well discuss those. If you look at one of the first posts from this year you will see a list of things we wanted to accomplish. Let's take a look at that list and see what we were able to do.
Professional Fog Machines: This year we were able to pick up a couple of really, really good fog machines. We weren't able to get the big, bad ones we wanted as the place we went to get them didn't have them in stock and couldn't get them in the time we wanted. We ended up buying two that in appearance looked just like the ones you could buy at any party store but the truth is they are built better and guaranteed to work or they will be fixed for free. This was good enough for us as they worked wonderfully and we couldn't be happier. Next year, we need to pick up two more and put a fog machine in all four corners of the Hollow!
New Bridge : Absolutely finished this one! The new bridge made the Hollow completely handicapped accessible for the first time ever and I couldn't be happier! Not only was the slope commercial grade (12 degrees for wheel chairs and walkers) but it exceeded the required width of 32 inches and instead was 48 inches wide. Plus, with the addition of some really cool skulls and some moss it looked really creepy in the green lights and fog. I am so very pleased with this new bridge.
Animate Hell Hole Guy: This we weren't able to do. The Hell Hole guy was exactly as static as he's been for the last couple of years. That's OK though. He still looked very cool.
New Fence Columns: Done! If you've read the blog then you've seen the new exit columns. I am very particular with everything I build, building it first in Google Sketch-up so I can figure out what I will need to build it and figure out how much it will cost. For some reason, I didn't do that when I built the first columns. When it came time to build the new columns I couldn't even get to the old columns, which were buried in the back of storage so I basically guessed on the dimensions. I got the height right but guessed a few inches too big on the length and width. Consequentially, these new columns are a little bigger than the old ones. Still, they look great and I am hoping nobody noticed how much larger the exit columns were than the enter columns. If they did, nobody told me. Let's see if anyone mentions in next year. :)
New Fencing: Another project completed! For the first time, the Hollow was completely surrounded with our "iron" fencing. This was a huge improvement as we initially used landscape fencing to mark the pathway and perimeter of the graveyard. I am so happy do be done with that.
New Mausoleum Guy: Well, we kind of accomplished this. We weren't able to find a popup guy for the mausoleum that we liked better than what we already had, which was a sound activated reaper. Prior to this prop we had a similar looking reaper but he was remote controlled. When he broke, we weren't able to find a remote control reaper but did find a sound activated reaper. Last year we had a problem with people not being loud enough to trigger him consistently. This year, thanks to the new "iron fencing" the mausoleum was pushed closer to the pathway and that seemed to make all the difference with how easily he was activated. So, we didn't need to get a new pop-up prop but we did add something new to the mausoleum, the creepy picture of the kids and a sound activated bat prop. You can see them in the video and they are very creepy. So, I'm calling this one kind of accomplished.
Swampify Graveyard: Not accomplished. We simply ran short of budget to convert the Hollow into more of a swamp graveyard. Maybe next year.
Tombstones: Another sort of accomplished one. We didn't make any new tombstones but we did add the Coffin Breaker Buy and the Ghost Face Tombstone to the graveyard so in a way we did add some new tombstones. Still, that's now really what I meant when I said I wanted to add new tombstones so that's why this is kinda accomplished.
Finish Sarcophagus Guy: Alas, no. I was really hoping to close the lid on Sarcophagus guy and install a motor that would shake the sarcophagus back and forth while quickly thumping the lid making it appear as though something was trying to free itself from it's tomb. I even bought the sound effect which would have been a low growling and snarling effect but in the end I ran out of time and wasn't able to install the motor. We ended up throwing Bucky 2 in the sarcophagus which looked cool, but ultimately wasn't what we wanted.
New Front Facade: Yes! Well, no. Well, yes! No, I guess not. I did add a fake stone pattern to the gables in our facade but I didn't do anything around the windows and I truthfully don't think anyone could actually see the decorated gables in the low lighting conditions of the Hollow. So, no, I guess I didn't finish this one. Plus, I really don't like the look of the gables. I've got a plan for next year though and it will be interesting to see if I actually get around to it.
Upgrade Coffin Guy for Electricity: Nope. I wasn't able to free the Coffin Guy from his pneumatic lifestyle. This year, he was still powered by air and not electricity. This is actually an interesting dilemma. You see, most professional haunters, as well as amateurs, seem to prefer pneumatics. This could be due to price, as after spending days looking online for deals on electric actuators the cheapest I could find them for was $250-$300! Air power is cheaper but the compressors are loud and can be distracting for the haunt. If we had more pneumatic props that would be one thing. I could definitely see the advantage of pneumatics over electric. Still, I do want more pneumatic props. I'm really going to have to look into the pros and cons before deciding what to do next year.
And that is the end of the list.
All in all, looking back at it, I feel we accomplished more than I originally thought. Perhaps that, along with the amazing turnout, is why I feel this year was so successful. Still, there are a few things on this list we weren't able to do.
So, now what?
Last year I promised that we would work year round to make this year the best Hollinger Hollow. We then did nothing for ten months and it really kicked our butts.
That's why we've decided that this year we actually WILL work year round to prepare for Hollinger Hollow 2013.
So, keep coming back from time to time and see if we are keeping our word. I wouldn't expect daily or even weekly updates but we plan on building one or two props a month starting in January (Thanksgiving, Christmas and New Year although not being as big as Halloween in our house still takes up a lot of our time) and if we do then we will definitely have plenty of updates and pics to share.
See ya!

Every October our front yard becomes Hollinger Hollow
Tuesday, November 13, 2012
A Shirt To Say "Thanks!"
Hey guys,
This year was a wonderful success and I want to say "thank you" to everyone who helped with making it a year to remember.
For those who assisted in the weeks leading up to, during and after Halloween I want to especially thank, and I couldn't think of a better way than by designing a shirt for everyone who helped.
I wish I could share this shirt with everyone but due to the cost of the shirts I am going to limit giving shirts to only those who specifically helped with setting up the Hollow or assisted during Halloween.
The shirt design will look like this...

I really like that logo and can't wait to see what they look like on the shirts.
For those who weren't able to help setup but who visit this blog, feel free to download the image to use however you please (just please don't use it to badmouth us).
Thanks again everyone! And, if you helped out keep an eye out for your shirt!
Tuesday, November 6, 2012
Coffin Breaker Guy!
Hey guys,
So, things got really close to the wire this season, and perhaps you remember the skeleton the wife was building for a new prop this season.
If you don't remember, here's a pic...

Now, this guy was moving along at a pretty fast pace but then we got sidetracked and before we new it, we had run out of time to finish him for the new prop.
As a matter of fact, we almost didn't finish this particular prop. The wife got really busy with the new exit columns and pumpkin toppers and I got seriously wrapped up in setting up the Hollow.
It wasn't until a couple days before Halloween that we came across Skully up there and began slapping our foreheads trying to figure out how we forgot about him.
The prop we were going to make was a Coffin Breaker, which is basically a skeleton that breaks his way out of his buried coffin.
Well, the wife asked if I could still build the coffin in time and I said I could so the plan was for me to whip up a coffin real quick and she would finish the skeleton.
So, off the garage I went, with 2 days until Halloween, and I built the framework for the coffin.
Again, this was all last minute and I didn't even think to take pictures of the building process. I'm afraid all I got was this one picture...
Later that same day, we came across an opportunity, through a friend, to pick up a really fantastic skeleton for a very, very great price. This ended up being perfect because we just didn't have the time we needed to complete our home made skeleton.
We decided to try the new skeleton out in this prop and he fit perfectly...

And then the wife cut out the foam pieces that would be the wood planks that make the coffin and she spray painted them brown. Sadly, we didn't get any pictures of this process either. It was, after all, Halloween day when she did all of this.
So, I'm afraid all we we have is a picture of the finished project, which you may remember from a previous post. We threw a couple of shackles on his wrists and added a big chain and threw him in the Hollow, paint still wet.

And there you have him, Coffin Breaker Guy!
It's so funny, because although all this turned out to be last minute, I can honestly say he was my favorite new prop this year.
Now we just need to come up with a new prop for old Skully up there. Since this turned out so well, perhaps we'll wait until a couple of days from next Halloween to finish him!
So, things got really close to the wire this season, and perhaps you remember the skeleton the wife was building for a new prop this season.
If you don't remember, here's a pic...

Now, this guy was moving along at a pretty fast pace but then we got sidetracked and before we new it, we had run out of time to finish him for the new prop.
As a matter of fact, we almost didn't finish this particular prop. The wife got really busy with the new exit columns and pumpkin toppers and I got seriously wrapped up in setting up the Hollow.
It wasn't until a couple days before Halloween that we came across Skully up there and began slapping our foreheads trying to figure out how we forgot about him.
The prop we were going to make was a Coffin Breaker, which is basically a skeleton that breaks his way out of his buried coffin.
Well, the wife asked if I could still build the coffin in time and I said I could so the plan was for me to whip up a coffin real quick and she would finish the skeleton.
So, off the garage I went, with 2 days until Halloween, and I built the framework for the coffin.
Again, this was all last minute and I didn't even think to take pictures of the building process. I'm afraid all I got was this one picture...
 |
| The coffin is constructed with 1/4" plywood that I ripped into the various strips of wood that make the sides, the back and the base. They are connected with pipe strapping and the screws were cut to length after installation. |
Later that same day, we came across an opportunity, through a friend, to pick up a really fantastic skeleton for a very, very great price. This ended up being perfect because we just didn't have the time we needed to complete our home made skeleton.
We decided to try the new skeleton out in this prop and he fit perfectly...

And then the wife cut out the foam pieces that would be the wood planks that make the coffin and she spray painted them brown. Sadly, we didn't get any pictures of this process either. It was, after all, Halloween day when she did all of this.
So, I'm afraid all we we have is a picture of the finished project, which you may remember from a previous post. We threw a couple of shackles on his wrists and added a big chain and threw him in the Hollow, paint still wet.

And there you have him, Coffin Breaker Guy!
It's so funny, because although all this turned out to be last minute, I can honestly say he was my favorite new prop this year.
Now we just need to come up with a new prop for old Skully up there. Since this turned out so well, perhaps we'll wait until a couple of days from next Halloween to finish him!
Monday, November 5, 2012
Hollinger Hollow 2012 Video!
Hey guys,
Well, I figured out the problem I was having last night uploading the video. Basically, the file size was too big.
So, after I re-compressed the file I was good to go and, as promised, here is the video.
<CAUTION> This file has sound and although it is work friendly you definitely want to check the volume on your player so as not to disturb your co-workers. Or, if you don't care about disturbing your co-workers, CRANK IT UP!!!
Alright. The video is a little dark, but I think it still looks good. There are definitely some shaky parts of the video but it was taken very late in the evening, well after the busy hours, and was filmed with my phone. Also, the re-conversion messed with the sound in parts and lessened the video quality so it's actually better to watch it in the window as opposed to full screen.
Still, it's a pretty nice little movie.
Hopefully, you can see how much fun it was and if you're looking for better images, see the pictures in the post below.
OK. That's all for today. Check back tomorrow as I will continue to post some updates for the rest of the week.
Later!
Sunday, November 4, 2012
Hollinger Hollow 2012 Pics!
Hey guys,
Wow! What a great Halloween!
An unofficial headcount put us over 1000 visitors to the Hollow this year!
The crowd was so big this year that at one point the traffic jam in front of our house caused the police to come out and do a little traffic control. That honestly has never happened before!
I want to thank everyone who helped us set up this year as well as the city of Mesquite and the residents of Quail Hollow who stopped by, some on multiple occasions, and made this year the tremendous success it was.
I have been working on a video and I actually got it finished but for some reason it isn't loading to the blog.
So, as a means to appease, I've decided to take a moment and post some pictures of the evening.
As always, click the pic for a larger image...
Honestly, it was a terrific night. We literally went down to the wire this year. I will be spending the next week updating the blog to catch everyone up.
Calling it a night for now, but more updates will follow.
Thanks again everyone!
Wow! What a great Halloween!
An unofficial headcount put us over 1000 visitors to the Hollow this year!
The crowd was so big this year that at one point the traffic jam in front of our house caused the police to come out and do a little traffic control. That honestly has never happened before!
I want to thank everyone who helped us set up this year as well as the city of Mesquite and the residents of Quail Hollow who stopped by, some on multiple occasions, and made this year the tremendous success it was.
I have been working on a video and I actually got it finished but for some reason it isn't loading to the blog.
So, as a means to appease, I've decided to take a moment and post some pictures of the evening.
As always, click the pic for a larger image...
 |
| Walking up to the Hollow. |
 |
| The gargoyle entrance. |
 |
| Bucky 1, one of the first props we ever built. |
 |
| Good old Hollis Weeb, who died morning the loss of the love of his life. |
 |
| The Mausoleum. |
 |
| With a newly added photo that is honestly just too creepy. This picture doesn't even come close to showing just how creepy this image is. |
 |
| Newly added this year. This was a last minute addition, the paint was literally still wet when we set it up Halloween night. It turned out to be my favorite new additions of the season. I built the frame and the wife carved and painted. The strobe pushed it over the edge! |
 |
| Phillip sits with Hollis. |
 | |
| The Blood Fountain! |
 |
| The New Bridge. |
 |
| A last minute change. We added Bucky 2 instead of a pop-up prop to the sarcophagus this year. |
 |
| Ghost Face Tombstone in action! |
 |
| A better pic of Bucky 2. |
 |
| The Reaper Scarecrow. The light post next to him is a new addition. It's flickering light was a cool effect. |
 |
| Zombie Baby Stabby says "Hello" as you cross the bridge. |
 |
| The Pop-Up Spider was a surprise hit this year. |
 |
| Spider-Guy, Pop-Up Spider's first victim of the evening. |
 |
| Coffin Guy was still the one that impressed the most. |
 |
| Looking across the Hollow from the exit. |
 |
| The Exit, with newly constructed columns and Pumpkin Statues! |
 | ||
| The Hollow! |
Calling it a night for now, but more updates will follow.
Thanks again everyone!
Sunday, October 28, 2012
Ghost Face Tombstone... A Three Year Project Nearly Complete!
Hey guys,
So, about three years ago I saw a prop from a home haunter that was a face coming out of a TV. It was super creepy and I loved it. I wanted to put it in our haunt, but a TV in a graveyard seemed odd, even for a Halloween display.
It took me a couple of days but suddenly the very obvious way to use it came to mind... a tombstone with a face coming out of it! Why it took a couple of days to come up with that is anybody's guess, I certainly don't know why.
But, I digress. I immediately sat down and drew up the plans and then, nothing. I never had time to build it.
But, that was the first year. Like I said, this idea is three years old.
Last year I revisited the idea and actually cut out a tombstone with a hole in the middle and went out and bought a small motor. "Small" is the operative phrase here. It was too small to push the face through the mesh. I then took apart several house fans and for one reason or another just couldn't make it work.
That brings us to this year. This year I was walking through a Halloween store when I saw this...
 |
| People with money and means can make this work using cheap plastic! |
So, for a price slightly cheaper than I paid for a
motor I will probably never use, I bought this Halloween prop and cannibalized
it!
Here's what I did...
 | |
| I took the face, conveniently housed in a face shaped motor housing and strapped it to the tombstone I made last year with pipe strapping and a couple of screws. Notice the little shelf where the old motor was once mounted, now no longer necessary. |
 |
| Here's the front. |
 |
| And here is the ghost face pushing out of the tombstone |
That's why I said the project is nearly complete.
I'll show you what it looks like when I finish.
Later.
Monday, October 22, 2012
There Be Tomstones in the Hollow... and a Mausoleum!
Hey everyone!
The Hollow took another step toward becoming a graveyard this weekend.
We added the tombstones as well as the Mausoleum. Have a look.
Click the pic for a larger image...
.JPG)
.JPG)
This ends the roughing out part of the Hallow construction. What I mean by that is that when you pass by the house you can now see we are building a graveyard.
Everything from this point forward is like putting the icing on the cake and, truthfully, this is where the fun begins.
Updates to follow...
The Hollow took another step toward becoming a graveyard this weekend.
We added the tombstones as well as the Mausoleum. Have a look.
Click the pic for a larger image...
.JPG) |
.JPG)
.JPG) | |
.JPG)
This ends the roughing out part of the Hallow construction. What I mean by that is that when you pass by the house you can now see we are building a graveyard.
Everything from this point forward is like putting the icing on the cake and, truthfully, this is where the fun begins.
Updates to follow...
Building Fencing!
Hey guys,
This weekend was quite productive, for after three years of planning I have finally finished the last of the "iron fencing" that surrounds the Hollow.
The first year that we did our fake iron fencing we used it to lay out the path that everyone follows as the pass through the Hollow. I knew that when we did it I would one day hope to have our fake iron fencing surround the entire graveyard.
The second year we expanded our iron fencing to line the front part of the graveyard, the part that backs up against our sidewalk.
And finally, this year, I built the fencing that would run along both sides of the graveyard and end at the house.
Last year I showed how our "iron fencing" was built but for those who are new to the blog and don't want to scroll down to last year I will show you again.
As always, click the pic for a lager image...
And that really is all there is to it. Be warned, despite it's very simple construction, the fencing is time consuming in their construction. This is simply due to the scale of the project. This year I built six fences and it takes about an hour per fence. That breaks down to about 30 minutes to construct and 30 minutes to paint.
I thought I would get faster the more I built these things but looking back I discovered that to be the average all three years I've built them. I'm sure there are some people who could do it faster than me though so go for it and give it a try.
Later.
This weekend was quite productive, for after three years of planning I have finally finished the last of the "iron fencing" that surrounds the Hollow.
The first year that we did our fake iron fencing we used it to lay out the path that everyone follows as the pass through the Hollow. I knew that when we did it I would one day hope to have our fake iron fencing surround the entire graveyard.
The second year we expanded our iron fencing to line the front part of the graveyard, the part that backs up against our sidewalk.
And finally, this year, I built the fencing that would run along both sides of the graveyard and end at the house.
Last year I showed how our "iron fencing" was built but for those who are new to the blog and don't want to scroll down to last year I will show you again.
As always, click the pic for a lager image...
 |
| The rails are constructed from 1x2's that are 8' long. Our fencing has 13 pickets so it's just a little math to figure out the spacing. Once you got that figured, simply drill the holes for the pickets. |
 |
| Our pickets are made from 1/2" PVC and their lengths are alternating 36" and 40". |
 |
| Spacing of the rails is whatever you think looks good. For our fencing, the bottom rails are 6" from the ground and the top rails are 6" from the top of the 36" pickets (or 30" from the ground). I use one drywall screw to attach the picket to each rail (or 2 screws per picket). |
 |
| Once constructed, paint the fence with flat, black spray paint. Our fencing takes 3 cans per fence. Don't get expensive paint, that is a waste of money. I've found that every home good store has a 99 cent can of black spray paint. That is perfect for this project. |
And that really is all there is to it. Be warned, despite it's very simple construction, the fencing is time consuming in their construction. This is simply due to the scale of the project. This year I built six fences and it takes about an hour per fence. That breaks down to about 30 minutes to construct and 30 minutes to paint.
I thought I would get faster the more I built these things but looking back I discovered that to be the average all three years I've built them. I'm sure there are some people who could do it faster than me though so go for it and give it a try.
Later.
Tuesday, October 16, 2012
Columns Complete!
Hey everyone,
Well, I said the next time you see the columns they will be out front in the Hollow and here they are...
.JPG)
As always, you can click the pic for a better view.
And I know I said yesterday they were officially done but now it is officially official.
So, now what's next? Well, the wife is working on the Pumpkin Statues to sit atop our new columns.
For me? If you look in the pictures above you will see the fencing doesn't run up the sides of the graveyard. I will start building new fencing to finally complete the look and for the first time ever, Hollinger Hollow will be completely wrapped in "iron" fencing.
Of course, more pictures and updates to follow...
Well, I said the next time you see the columns they will be out front in the Hollow and here they are...
.JPG) |
| If you look way down on the other end you will see the old columns! |
.JPG)
As always, you can click the pic for a better view.
And I know I said yesterday they were officially done but now it is officially official.
So, now what's next? Well, the wife is working on the Pumpkin Statues to sit atop our new columns.
For me? If you look in the pictures above you will see the fencing doesn't run up the sides of the graveyard. I will start building new fencing to finally complete the look and for the first time ever, Hollinger Hollow will be completely wrapped in "iron" fencing.
Of course, more pictures and updates to follow...
Sunday, October 14, 2012
Columns Complete... Well, Sort Of...
Hey everyone,
The new Exit Columns are finished...
OK, well, not quite, but let me show you what they look like.
Well, they look pretty much done. That's true. I still need to add one more coat of polyurethane. It won't change the look but it will help ensure the new columns are weatherproof.
So, since I'll do that first thing tomorrow, for the purpose of the blog, I am willing to call them done.
The next time you see them they will be out front in the Hollow.
The new Exit Columns are finished...
OK, well, not quite, but let me show you what they look like.
 |
| After the wife aged them up... |
 |
| And after I (the wife doesn't have time to do everything) put on one coat of polyurethane. |
Well, they look pretty much done. That's true. I still need to add one more coat of polyurethane. It won't change the look but it will help ensure the new columns are weatherproof.
So, since I'll do that first thing tomorrow, for the purpose of the blog, I am willing to call them done.
The next time you see them they will be out front in the Hollow.
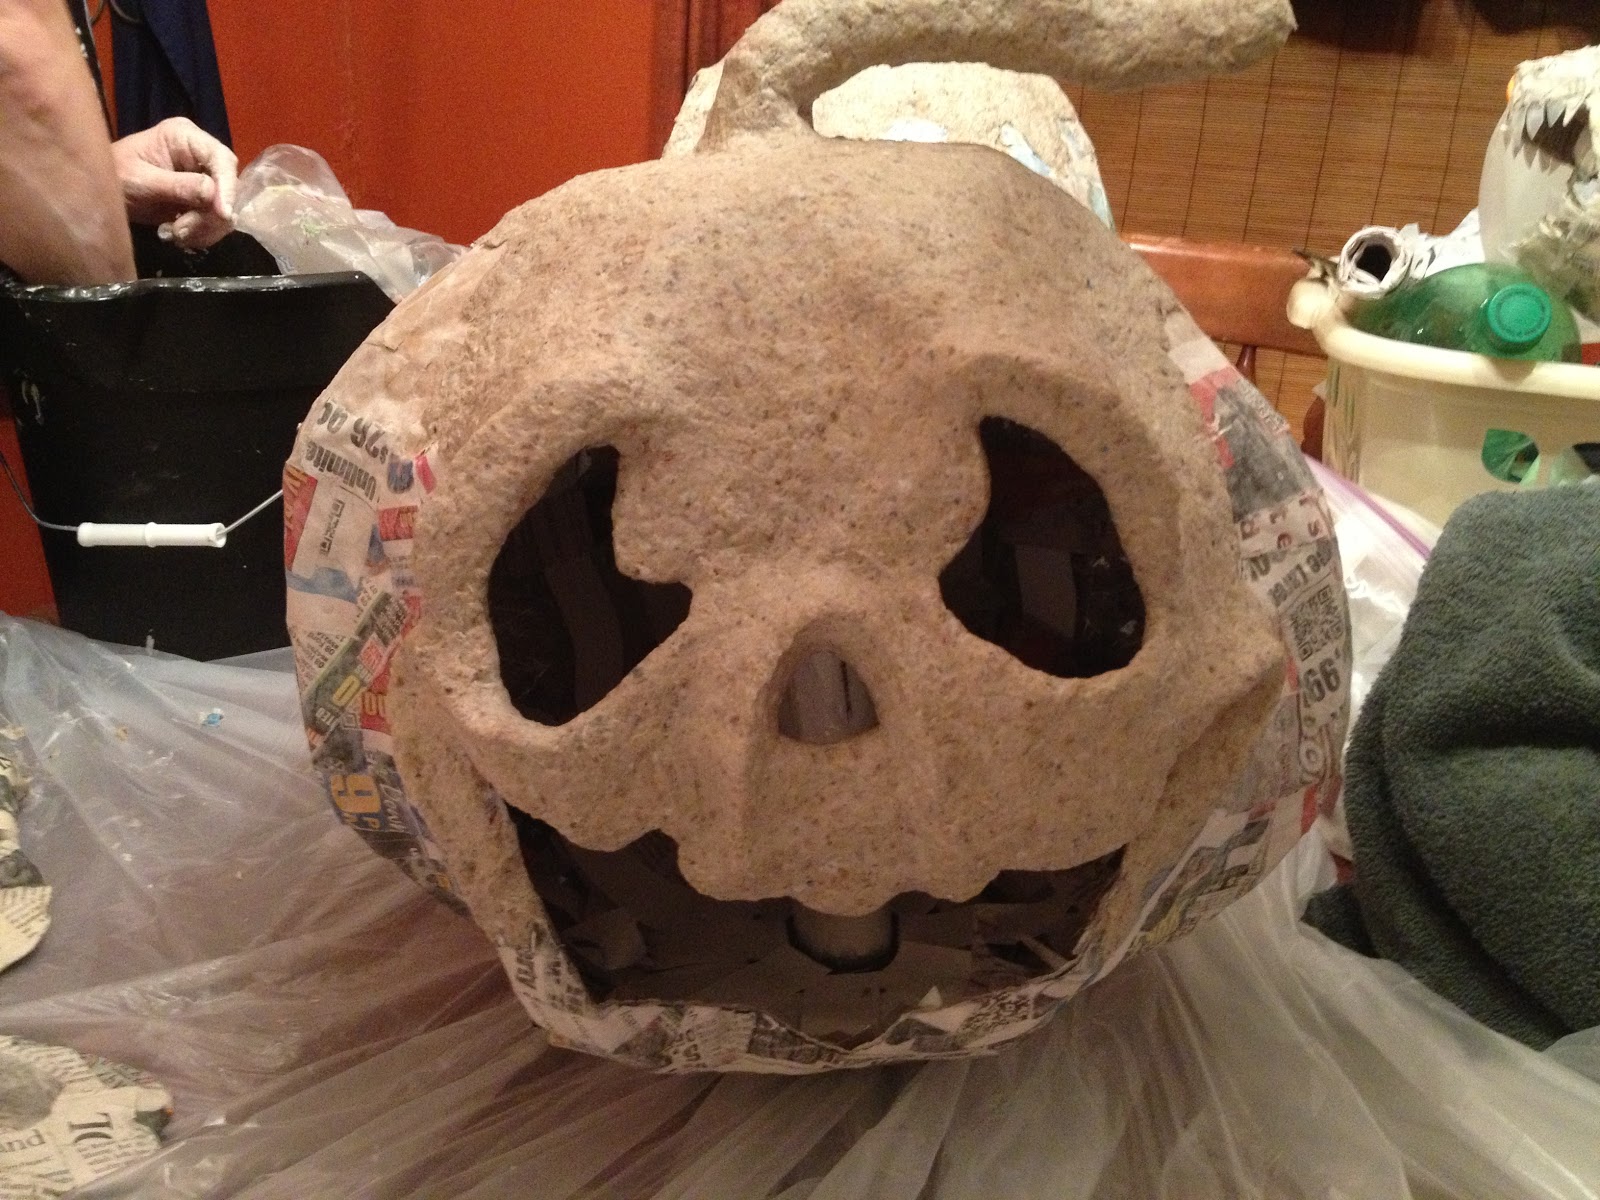
It's Pumpkin Statue Time!
Hey guys,
The wife was hard at work again today. Not only did she work her magic on the columns, she also started applying the clay mache to the Pumpkin Statues that will sit atop the columns.
And here is what they look like now...
So this pretty much gives you an idea of what they will look like, minus the Monster Mud that is.
Of course, I'll keep providing pics until they are finished.
The wife was hard at work again today. Not only did she work her magic on the columns, she also started applying the clay mache to the Pumpkin Statues that will sit atop the columns.
And here is what they look like now...
 |
| This one is too funny! |
 |
| And although you're suppose to love your pumpkin statues equally, I have to admit, this one is my favorite! |
So this pretty much gives you an idea of what they will look like, minus the Monster Mud that is.
Of course, I'll keep providing pics until they are finished.
The Hollow Emerges From the Fog!
Hey everyone!
Well, it's not much, but it's a start.
We started moving parts of the Hollow to the front yard today.
The first step of setting everything up is what I call the "foundation" of Hollinger Hollow. Simply put, it is the footprint, the fencing and the bridge...
And there you have it. Again, it's not much, but it's a start.
More to follow...
Well, it's not much, but it's a start.
We started moving parts of the Hollow to the front yard today.
The first step of setting everything up is what I call the "foundation" of Hollinger Hollow. Simply put, it is the footprint, the fencing and the bridge...
 |
| The entrance. Notice how you can't see the column-less exit... |
 |
| And the bridge. Darn, you can see the column-less exit. |
And there you have it. Again, it's not much, but it's a start.
More to follow...
Columns Coming Along!
Hey guys,
So, progress on the new exit columns continued this last week and for those who might have missed how we did this last year I thought I'd show you how it was done.
Construction of the columns was shown in a previous post. Now has come the time to start decorating them.
As always, click the pic for a larger image...
And that is as far as we are at the moment. Last years columns had a darker gray paint used in the Monster Mud but this year's paint was a little to light for us so we will follow this up with a light staining of the "concrete" and then we will put an aging glaze on top. Once done, a couple coats of polyurethane to seal it up and protect it from the weather and we'll be done.
Of course, we'll have pics of that to show you as well.
Until then....
So, progress on the new exit columns continued this last week and for those who might have missed how we did this last year I thought I'd show you how it was done.
Construction of the columns was shown in a previous post. Now has come the time to start decorating them.
As always, click the pic for a larger image...
 |
| First thing is to draw the pattern you want to carve. |
 |
| Then grab your trusty burner and burn the patter into the foam. |
 |
| Alright, this pic shows a couple different steps. First is to add the "stone" base and caps to the columns. This is done with 2x4's and a 1/4" sheet of plywood across the top. All glued and screwed. The second part is to make and apply your exterior coating. This is what gives all the foam and wood a stone look and feel. We got the recipe for the "Monster Mud" online and it is a very simple 5 parts drywall compound mixed with 1 part paint. The paint can be whatever color you want but we went with a light gray to simulate concrete. Apply Monster Mud with a brush. |
 |
| Look! One of last years entrance columns with this years, newly mudded exit columns. |
 | |||
| And here is one of the new columns getting it's bricks painted. Dark gray for the mortar and a fresh coat of red topped with a fresh coat of black for the bricks. |
And that is as far as we are at the moment. Last years columns had a darker gray paint used in the Monster Mud but this year's paint was a little to light for us so we will follow this up with a light staining of the "concrete" and then we will put an aging glaze on top. Once done, a couple coats of polyurethane to seal it up and protect it from the weather and we'll be done.
Of course, we'll have pics of that to show you as well.
Until then....
Subscribe to:
Posts (Atom)